
Making a Sale
Making a sale in Desktop POS takes you from an empty till to a fiscally signed receipt in a few steps — add products, adjust the cart, apply any discounts, and charge. This page walks through the full end-to-end flow.
Before You Start
Make sure you have:
Signed in with your cashier PIN
A confirmed SDC connection (card present, PIN verified) — see Fiscal Compliance
An open shift — see Daily Report
Step 1: Add Products
Products are added from the main sales screen.
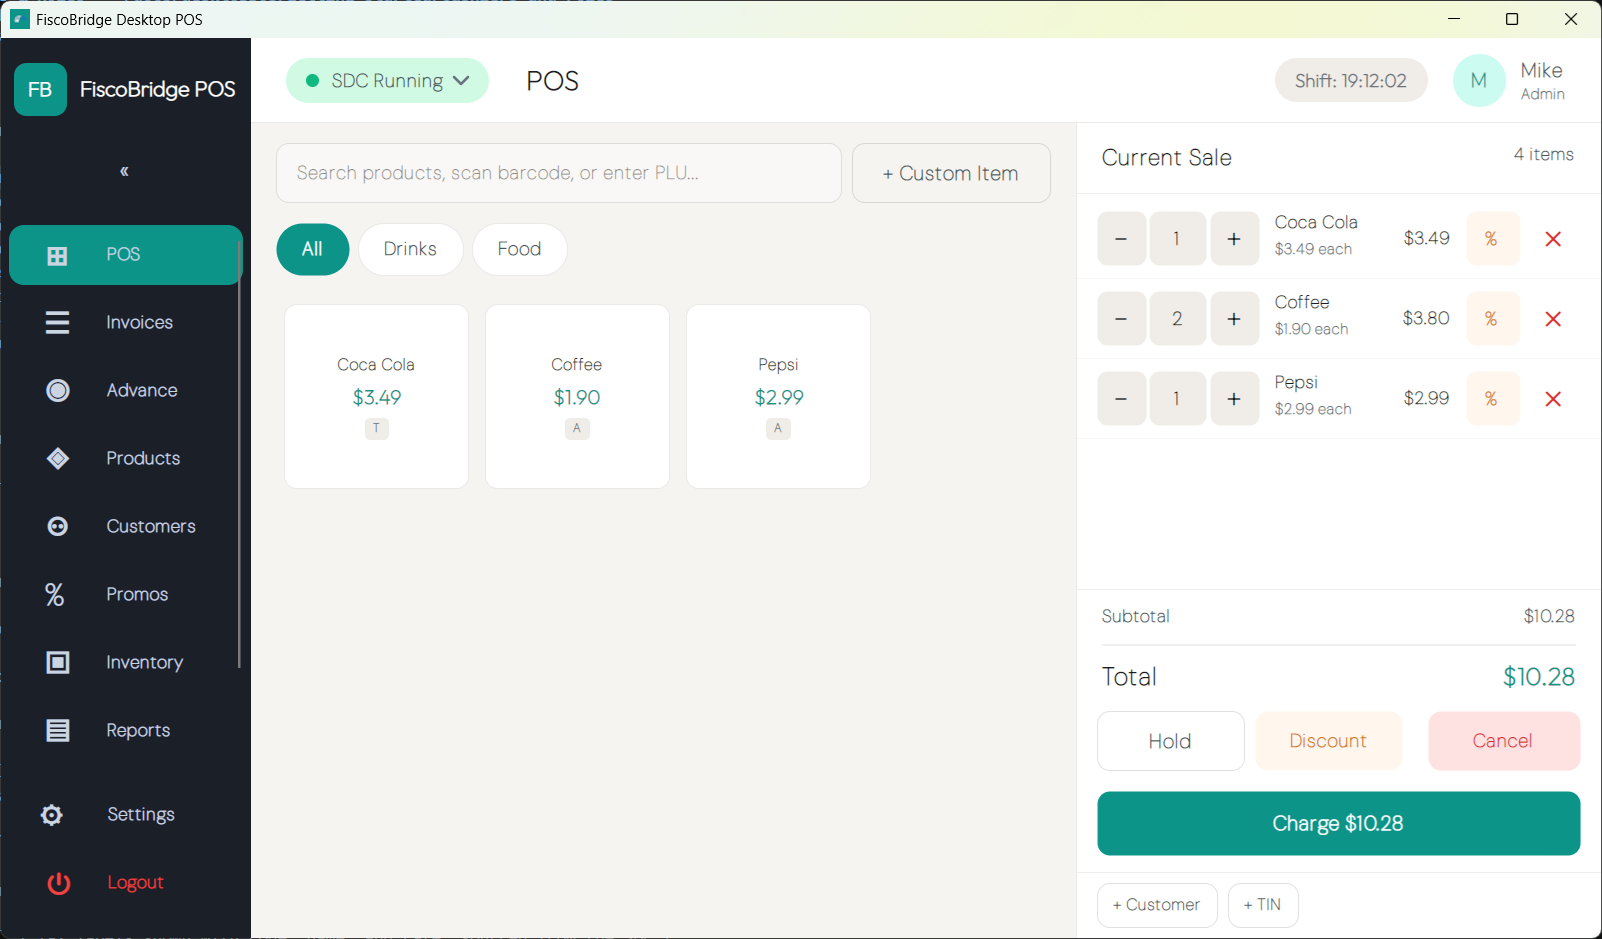
You can add products in several ways:
Tap a product on the grid — the product is added to the cart immediately
Filter by category or subcategory — use the category sidebar on the left to narrow the grid to a specific category or subcategory
Search by name — type in the search box at the top of the grid; results update as you type
Scan a barcode — point the scanner at the product; Desktop POS detects the scan automatically and adds the matching product
Enter a PLU code — type a PLU code to find and add a product by its lookup number
Each tap or scan adds one unit to the cart. Tap the same product again to increment the quantity.
Tip: Barcode scans are auto-detected — no button press needed. The scanner input is always active on the sales screen.
Adding an open-price item
When a product does not exist in the catalog — for example, a one-off service or a product without a preset price — you can create an open-price item on the fly:
Tap Open Price Item (or the equivalent button on your layout)
Enter a name for the item
Enter the unit price
Select one or more tax labels from the list
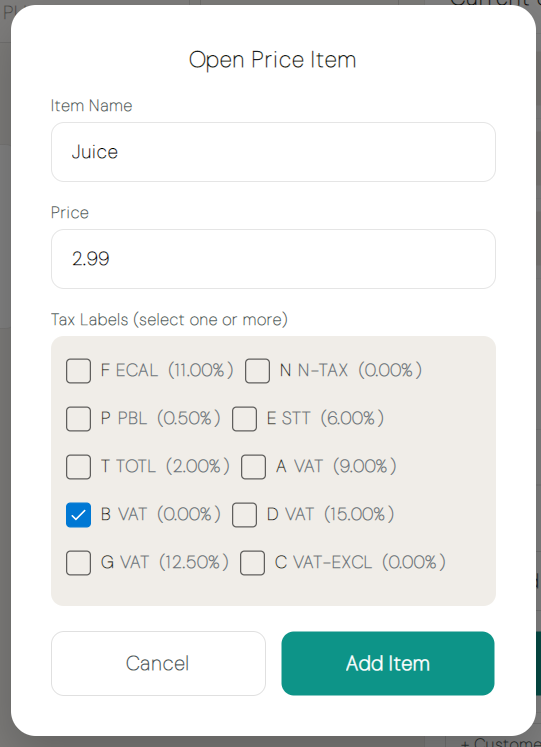
The item is added to the cart as a single line with the details you entered.
Step 2: Adjust the Cart
Once products are in the cart, you can adjust quantities, change prices, and remove lines before charging.
Changing quantity
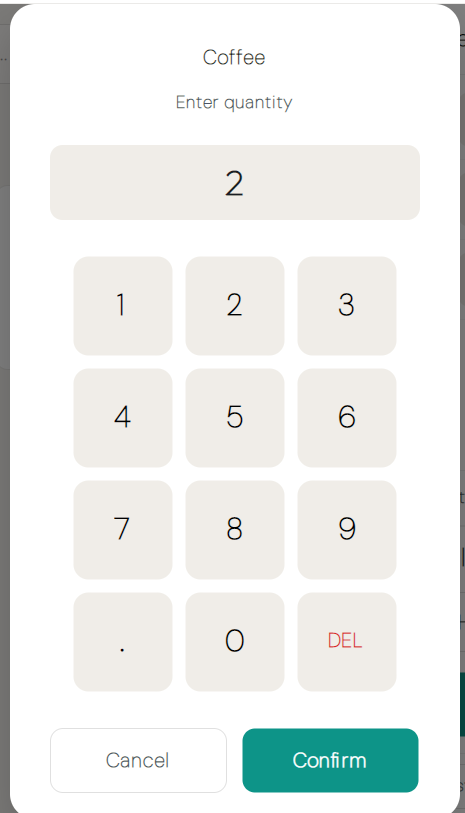
Tap the quantity on a cart line (or tap the line and use the + / − controls)
The quantity adjuster opens — enter a value directly or use the increment/decrement buttons
Decimal quantities are supported for items sold by weight or measure (for example,
0.75 kg)
Changing the price (price override)
You can override the unit price of a line at the till — useful for price-matching or a negotiated price:
Tap the cart line, then tap Price (the price-override control on the line)
Enter the new unit price
Confirm — the new price applies to that line
Price overrides are manager-PIN gated, the same as discounts: if you are signed in as a Cashier, a Manager must enter their PIN to approve the new price. The overridden price is the one used for that line on the fiscal invoice.
Removing a line (void)
Tap the remove (×) icon on a cart line to delete it from the cart. This is the void function — any selected item can be removed from the cart at any time before the invoice is fiscalized.
Holding a cart (parked carts)
If you need to pause a sale and serve another customer without losing the cart:
Tap Hold Cart — the current cart is saved as a parked cart
A fresh, empty cart opens so you can start a new sale
When you're ready to return, tap Show Parked Carts and select the parked cart to recall it
Tip: Hold a cart to serve another customer, then recall it. A cart stays parked until you recall and complete it or dismiss it.
Step 3: Discounts
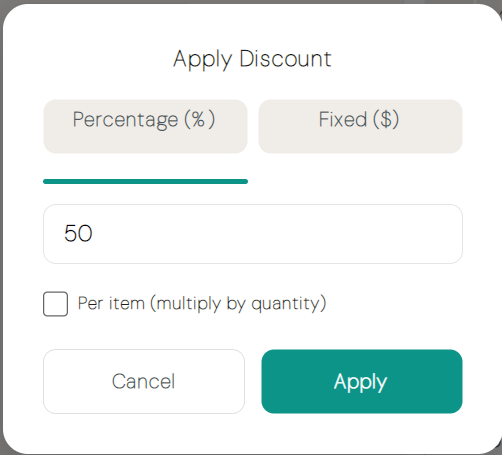
Desktop POS supports line-level and cart-level discounts, applied either as a percentage or a fixed amount.
Applying a line discount
Tap the cart line you want to discount
Tap Discount (or the discount icon on the line)
Choose Percentage or Fixed Amount
Enter the value
If the line has a quantity greater than 1, choose whether the discount applies per item or to the line total
Confirm — the discount is shown on the cart line
Applying a cart discount
Tap Cart Discount (at the bottom of the cart panel)
Choose Percentage or Fixed Amount and enter the value
The discount is applied to the cart total
Discounts require manager approval
Both line and cart discounts are manager-PIN gated — a manager PIN prompt appears when you apply a discount. If you are signed in as a Manager, you enter your own PIN; if you are a Cashier, a Manager must enter their PIN.
Stacking and promotions
Promotions (configured under Catalog & Inventory → Promotions) apply automatically when their rules are met. They appear on the cart before you manually apply a discount.
Whether a manual discount can be combined with a promotion depends on the promotion's stacking rules — see Promotions.
Note: Promotions are evaluated automatically. A promotion banner appears on the cart line when a promotion has been applied.
Step 4: Assign a Customer (Optional)
Attaching a customer to a sale is optional but recommended for B2B sales (where a Tax ID is required).
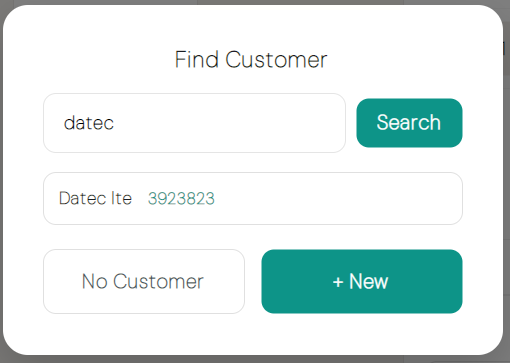
Tap Customer (or the customer search icon in the cart panel)
Search by name or TIN (Tax ID)
Select from the results to attach the customer
If the customer is not in the directory:
Tap Quick Create, enter the customer's name and TIN, and save — the customer is created and attached immediately
Or enter a TIN directly into the Tax ID field without searching (for one-off B2B transactions)
The customer's name and Tax ID appear on the receipt and in the invoice record.
Step 5: Charge & Pay
When the cart is ready, initiate payment.
Tap Charge Cart
The payment dialog opens, showing the invoice total
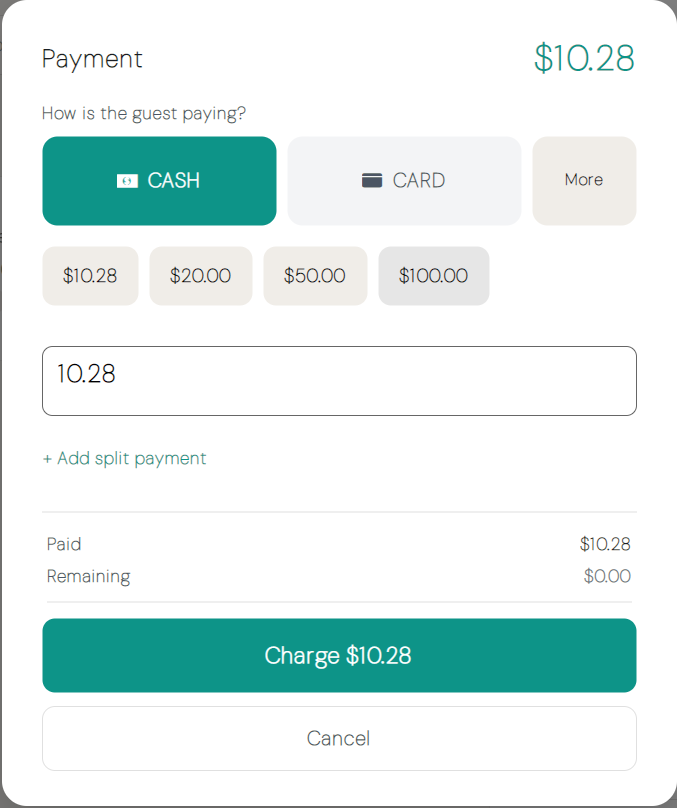
Select the payment method (Cash, Card, Check, Wire Transfer, Voucher, Mobile Money, or Other)
For Cash payments:
Use the denomination quick-buttons to fill in a common tendered amount, or type the amount received
The change amount is calculated automatically
For split payments — where the customer pays with more than one method — tap Add Payment Method and add a row for each additional method. See Payment Types for full split-payment instructions.
Note: You cannot fiscalize with an unbalanced split. The Remaining amount must reach
0.00before the Fiscalize button is enabled.
Step 6: Fiscalize
When the payment is balanced, tap Fiscalize in the payment dialog. The invoice is sent straight to the SDC for signing — there is no separate confirmation step.
Tap Fiscalize
The SDC signs the invoice and returns the fiscal result
The cash drawer kicks automatically after a successful fiscalization
Note: You cannot fiscalize with an empty cart or an unbalanced payment split. If the SDC is offline, the card is absent, or the PIN has not been verified, the Fiscalize button is disabled.
After the Sale
Once the invoice is signed, the post-sale screen is shown.
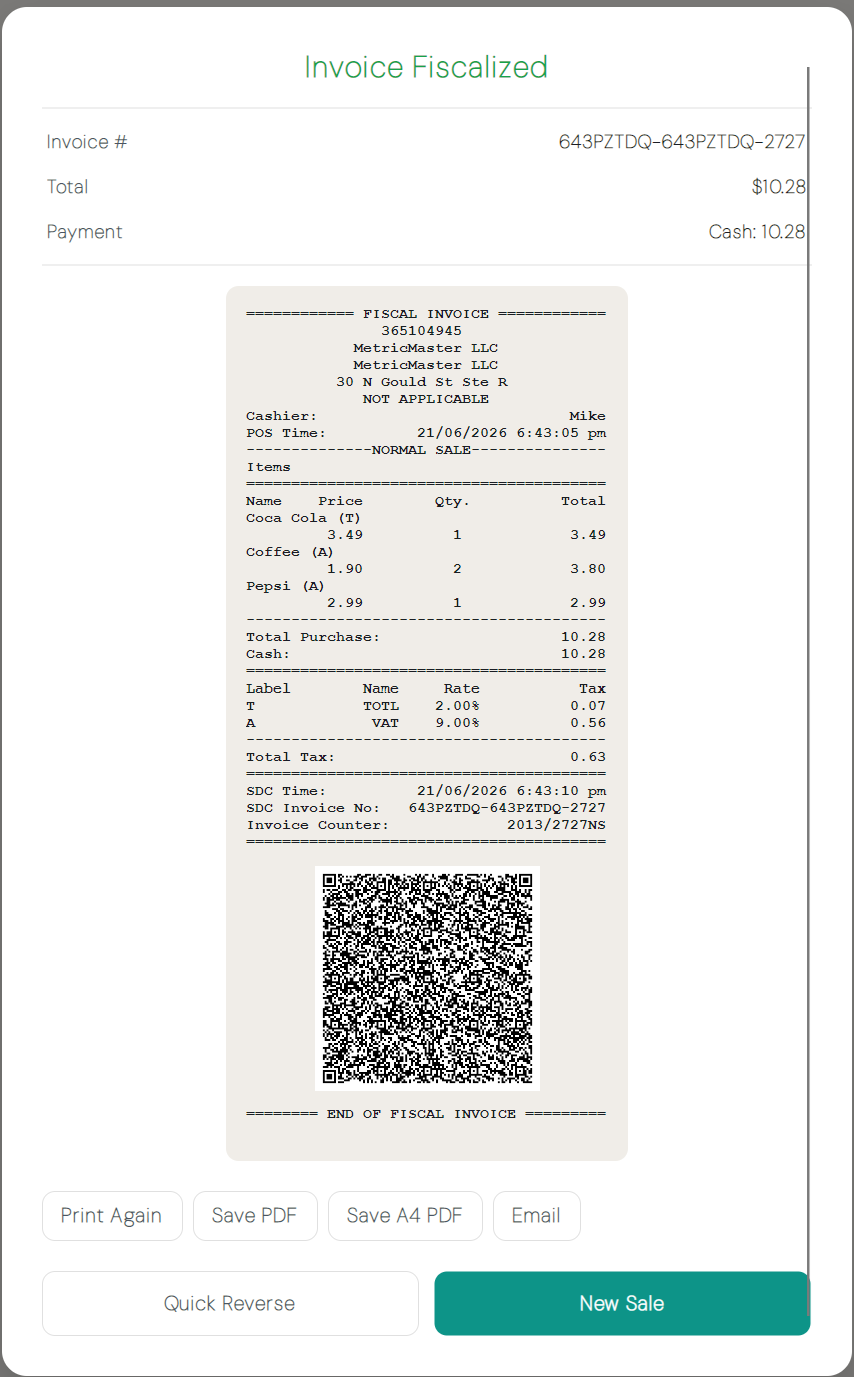
Field | Description |
|---|---|
Invoice Number | The fiscal invoice number assigned by the SDC (format: RequestedBy-SignedBy-OrdinalNumber) |
QR Code | Scannable code linking to the public verification URL for this invoice |
Journal | The electronic journal entry for this sale |
Payment Summary | Breakdown of payment methods and amounts tendered |
Change | Change due to the customer (cash payments only) |
From here you can:
Print the receipt — See Printing
Email the receipt — See Printing
Start a new sale — The cart resets and you return to the product grid
Next Steps
Payment types — All payment methods and how split payments work
Printing — Print or email a fiscal receipt
Invoice types — Normal, Training, Proforma, Advance, and Copy invoice types
Refunds, copies & cancellations — Post-sale invoice operations